

You’ve just migrated your WordPress site. That’s a sweet victory, right? But then you notice your site’s throwing tantrums like a toddler who missed naptime.

Pages are not loading, there are weird redirects, or there are straight-up “server not found” errors. Classic DNS issues post-migration. Before you spiral into the digital abyss, take a breath. This guide’s got your back.
What’s Actually Happening With Your DNS?

When you migrate your WordPress site, you’re essentially changing your website’s digital address. Your DNS (Domain Name System) needs time to recognize this change—like the internet’s GPS recalculating your route.
The DNS propagation process isn’t instant. It’s more like telling everyone at a party you’ve moved—some people get the memo right away, others take their sweet time. This delay is what causes those annoying “site not found” errors after migration.
The Technical Side (Without the Headache)
DNS works by translating your domain name (yoursite.com) into an IP address (like 192.168.1.1) that computers understand. During migration, you’re telling DNS servers worldwide to point your domain to a new IP address. This update can take anywhere from a few hours to 72 hours to fully propagate.
Common DNS Issues After WordPress Migration
1. The Dreaded “Site Not Found” Error
You type in your URL and get… nothing. This usually means your DNS records haven’t been updated yet, or they’re pointing to the wrong place entirely.
Quick Fix: First, check if your DNS records have been properly configured at your domain registrar. Ensure the nameservers or A records point to your new host. If they’re correct, sometimes the solution is just patience—wait for propagation to complete.
2. Mixed Content Warnings
Your site loads, but with security warnings or missing images. The classic symptom of a half-baked migration.
Quick Fix: This typically happens when your site URL still contains HTTP instead of HTTPS (or vice versa) in some places. Check your WordPress settings and update your site URL and home URL to match your new configuration.
3. Redirect Loops
You’re stuck in digital purgatory—your browser keeps redirecting in an endless loop.
Quick Fix: This often happens when your WordPress configuration and server configuration are conflicting. Check your .htaccess file for redirect rules that might clash with your WordPress settings.
Your Step-by-Step DNS Fix Toolkit
Step 1: Verify Your DNS Configuration
First things first—let’s make sure you’ve got the right settings.
- Log into your domain registrar account (GoDaddy, Namecheap, etc.)
- Navigate to DNS management
- Check that your nameservers match what your new host provided
- If using A records, verify they point to your new server’s IP address
Pro Tip: Take screenshots before making any changes. Your future self will thank you if you need to revert.
Step 2: Clear Local DNS Cache
Your computer keeps its own little DNS phonebook that needs updating:
For Windows:
- Open Command Prompt as Administrator
- Type
ipconfig /flushdnsand hit Enter - You’ll see “Successfully flushed the DNS Resolver Cache”
For Mac:
- Open Terminal
- For macOS Monterey or newer, type
sudo dscacheutil -flushcache; sudo killall -HUP mDNSResponder - Enter your password when prompted
Step 3: Update WordPress Configuration
Make sure WordPress itself knows about its new home:
- Log into your WordPress dashboard
- Go to Settings > General
- Update both “WordPress Address (URL)” and “Site Address (URL)”
- Save changes
If you can’t access your dashboard, you can update these settings in your wp-config.php file by adding:
define('WP_HOME','https://yournewdomain.com');
define('WP_SITEURL','https://yournewdomain.com');
Step 4: Check Your .htaccess File
The .htaccess file can make or break your site’s accessibility:
- Connect to your site via FTP
- Download the .htaccess file (it’s usually in your root directory)
- Look for any hardcoded references to your old domain
- Update them to your new domain or remove them if unnecessary
- Upload the modified file
Step 5: Fix SSL Configuration
If you’re using HTTPS (and you should be), ensure your SSL certificate is properly installed:
- Check if your new host has automatically installed SSL
- If not, install SSL through your hosting control panel or a service like Let’s Encrypt
- Once installed, force HTTPS by adding this to your wp-config.php:
define('FORCE_SSL_ADMIN', true);Advanced Troubleshooting Techniques
Using Online DNS Lookup Tools
Sometimes you need to see what the world sees:
- Visit a DNS propagation checker like whatsmydns.net
- Enter your domain name
- Check how your DNS is resolving across different global servers
This tells you if the problem is global or just on your end.
Temporary Hosts File Modification
Can’t wait for propagation? This workaround lets you access your site immediately:
For Windows:
- Navigate to C:\Windows\System32\drivers\etc
- Open the “hosts” file with Administrator privileges in Notepad
- Add a line:
your.server.ip.address yourdomain.com - Save changes
For Mac/Linux:
- Open Terminal
- Type
sudo nano /etc/hosts - Add a line:
your.server.ip.address yourdomain.com - Save with Ctrl+O, then Exit with Ctrl+X
Remember: This only works on your computer. Remove these entries once propagation completes.
Preventing Future DNS Headaches
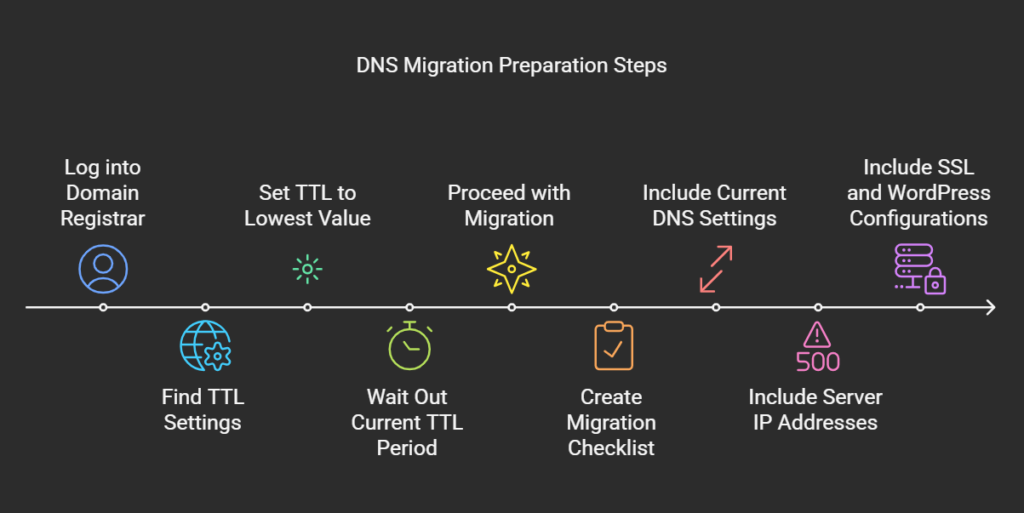
Set Lower TTL Values Before Migration
Time-To-Live (TTL) tells DNS servers how long to cache your records. Lower this value before migration:
- Log into your domain registrar
- Find TTL settings for your domain (usually under advanced DNS)
- Set to the lowest allowed value (often 300 seconds/5 minutes)
- Wait out the current TTL period
- Proceed with migration
This ensures faster propagation when you make the actual change.
Document Everything
Create a migration checklist that includes:
- Current DNS settings
- Server IP addresses
- Nameservers
- SSL certificate details
- WordPress configuration
Having this info at hand makes troubleshooting infinitely easier.
When All Else Fails
Sometimes you need backup:
- Contact your hosting provider’s support
- Reach out to your domain registrar
- Consider temporarily pointing to your old server while troubleshooting
- Use a service like Cloudflare as a DNS intermediary
Final Thoughts
DNS issues post-migration are like bad weather—inevitable but temporary. The key is preparation and patience. Most issues are resolved within 24-48 hours as propagation completes.
Remember that even the most experienced developers face these challenges. The difference is in how quickly you identify and address the root cause.
Have you faced a particularly challenging WordPress migration? Drop a comment below—I’d love to hear your war stories and how you conquered them.
This guide was last updated on February 28, 2025, to reflect the most current WordPress and DNS management practices.